
When working with Node.js, you might encounter situations where you need to install multiple versions of the runtime.
For example, maybe you have the latest version of Node set up on your machine, yet the project you’re about to start working on requires an older version, so you need to downgrade. Or maybe you’re upgrading an old Node project to a more modern version and it would be handy to be able to switch between the two while you make the transition.
Without a good tool, this would mean spending a lot of time and effort manually uninstalling and reinstalling Node versions and their global packages to install the required Node version. Fortunately, there’s a better way!
nvm stands for Node Version Manager. As the name suggests, it helps you manage and switch between different Node versions with ease. It provides a command-line interface where you can install different versions with a single command, set a default, switch between them and much more.
nvm supports both Linux and macOS, but that’s not to say that Windows users have to miss out. There’s a second project named nvm-windows that offers Windows users the option of easily managing Node environments. Despite the name, nvm-windows is not a clone of nvm, nor is it affiliated with it. However, the basic commands listed below (for installing, listing and switching between versions) should work for both nvm and nvm-windows.
Let’s first cover installation for Windows, macOS and Linux.
First, we need to do a little preparation:
After this, download and run the latest stable installer and you should be good to go!
Unlike Windows, removing previous Node and npm versions in macOS and Linux is optional. If this is something you want to do, there are plenty of good resources available online. For example, here’s how to remove Node on macOS and on Linux. And here’s how you can remove any previous npm installation you might have.
You can install nvm using cURL or Wget.
For cURL, run the following on your terminal:
Or with Wget:
Note that the version number (v0.35.2) will change as the project develops, so it’s worth checking the relevant section of project’s home page to find the most recent version.
This will clone the nvm repository to ~/.nvm and will make the required changes to your bash profile, so that nvm is available from anywhere in your terminal.
And that’s it! Reload (or restart) your terminal and nvm is ready to be used.
If installed correctly, the nvm command is available anywhere in you terminal. Let’s see how to use it to manage Node.js versions.
One of the most important parts of nvm is, of course, installing different versions of Node.js. For this, nvm provides the nvm install command. You can install specific versions by running this command followed by the version you want. For example:
By running the above in a terminal, nvm will install Node.js version 12.14.1.
Tip: nvm-windows users will have to run nvm use 12.14.1 after installing.
nvm follows SemVer, so if you want to install, for example, the latest 12.14 patch, you can do it by running nvm install 12.14.
nvm will then install Node.js version 12.14.X, where X is the highest available version. At the time of writing, this is 1, so you’ll have the 12.14.1 version installed on your system.
You can see the full list of available versions by running nvm ls-remote.
For nvm-windows, this is nvm ls available.
Tip: listing all available Node versions produces a lot of output. Linux users might like to qpipe that to less or grep the version they’re after. For example, nvm ls-remote | less, or nvm ls-remote | grep v12.
When installing a Node.js instance, nvm will also install a compatible npm version. Each Node version might bring a different npm install, and you can run npm -v to check which one you’re currently using. Globally installed npm packages aren’t shared among different Node.js versions, as this could cause incompatibilities. Rather, they’re installed alongside the current Node version in ~/.nvm/versions/node/<version>/lib/node_modules. This has the added advantage that users won’t require sudo privileges to install global packages.
Fortunately, when installing a new Node.js version, you can reinstall the npm global packages from a specific version. For example:
By running the above, nvm will install Node.js version 12.14.1, the exact version of npm required, and reinstall the global npm packages you had installed for the 10.18.1 version.
If you’re not sure what the latest version is, you can use the node alias:
Or you can install the most recent LTS release, using:
You can also uninstall any instance you no longer think is useful, by running:
So far, we’ve seen how to install different Node versions. Now let’s go through how to switch between them (effectively upgarding or downgrading your Node version). Let me first note that when a new version is installed, it’s automatically put to use. So if you install the latest Node.js version, and run node -v right after, you’ll see the latest version output.
To switch through installed versions, nvm provides the nvm use command. This works similarly to the install command. So, you need to follow this by a version number or an alias.
Switch to Node.js version 13.6.0:
Switch to Node.js version 12.14.1:
Switch to the latest Node.js version:
Switch to the latest LTS version:
When switching to a different version, nvm will make the node instance in your terminal symlink to the proper Node.js instance.
You can also create custom aliases beyond the ones that come with nvm. For example, by running:
You’re setting an alias with the name “awesome-version” for Node.js version 13.6.0. So, if you now run:
nvm will switch node to version 13.6.0. You can delete an alias by running:
You can also set a default instance to be used in any shell, by targeting a version to the “default” alias, like so:
At any time you can check which versions you have installed by running:
This will display something resembling the image below.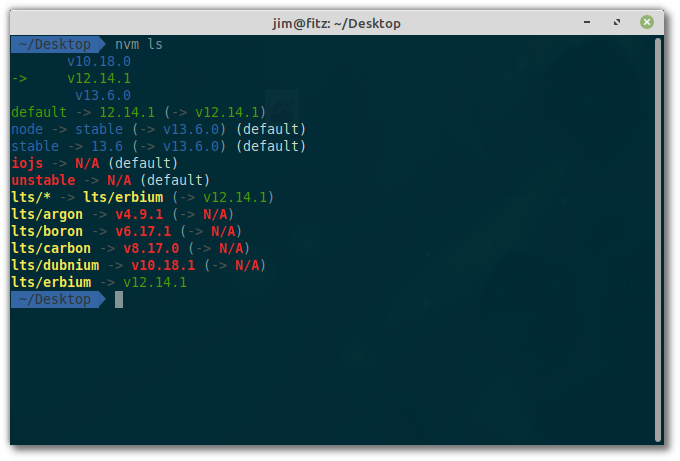
The entry in green, with an arrow on the left, is the current version in use. Below the installed versions, there’s a list of available aliases. Try executing the following now:
It will display like so: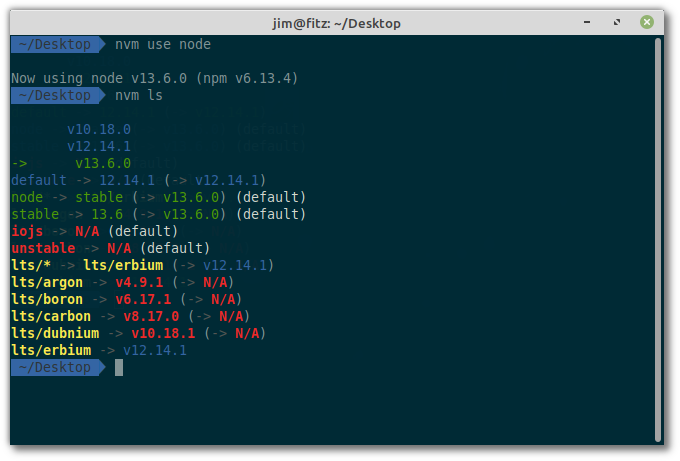
You can also check what is the current version in use with the command:
Version managers such as rbenv allow you to specify a Ruby version on a per-project basis (by writing that version to a .ruby-version file in your current directory). This is kind of possible with nvm in that, if you create a .nvmrc file inside a project with a specific Node version, you can cd into the project directory and type nvm use. nvm will then read the contents of the .nvmrc file and use whatever version of Node you specify.
If it’s important to you that this happens automatically, there are a couple of snippets on the project’s home page for you to add to your .bashrc or .zshrc files to make this happen.
Here’s the ZSH snippet. Place this below your nvm config:
Now, when you change into a directory with a .nvmrc file, your shell will automatically change Node version.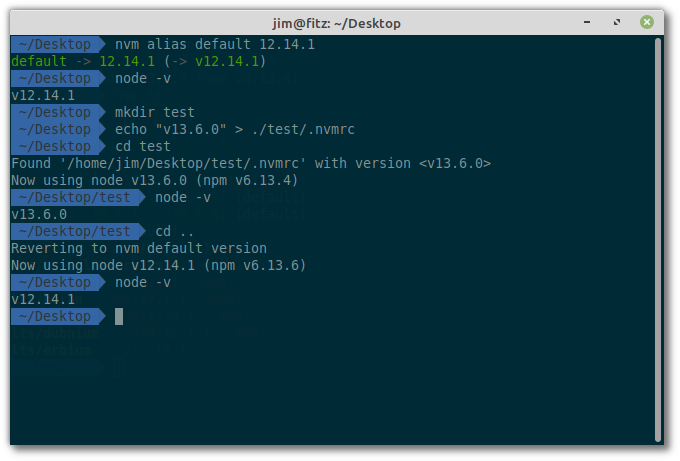
nvm provides a couple of other commands that are more advanced or less commonly used.
You can run a command directly for an installed version without switching the node variable:
You can run a command on a sub-shell, targeting a specific version:
You can get the path to the Node.js executable of a specific installed version:
This might be useful when configuring a text editor plugin that needs to know where your current version of Node lives.
nvm is a great tool for any Node.js developer. It enables a concern-free installation and easy switching between different versions, saving time for what really matters.
A thank you note to Tim Caswell, the creator of nvm, and also to Corey Butler for the nvm for Windows support, and of course to those contributing to these great projects. Your work is greatly appreciated by the Node.js community.
What about you? Do you use nvm? How has your experience been with it? Hit up Michael or James on Twitter if you’d like to chat.
nvm supports both Linux and macOS. Windows users should use either WSL, or nvm-windows.
You can install NVM by following the installation instructions provided for your operating system. Typically, it involves running a script in your terminal or command prompt.
Yes, NVM can be configured to work with various shells like Bash, Zsh, and Fish. The installation instructions often include details on configuring NVM for your preferred shell.
While NVM’s primary focus is on Node.js, there are community-maintained projects like “pyenv” for Python version management that are inspired by NVM’s concept.
You can update NVM using the command nvm update.
It’s generally recommended to use only one Node.js version manager at a time to prevent conflicts. Using NVM alongside other managers could lead to unexpected behavior.
No, NVM allows you to install and manage stable, LTS (Long-Term Support), and even development versions of Node.js.
No, NVM can also manage installations of npm (Node Package Manager) alongside Node.js versions. When you switch Node.js versions, NVM will also switch to the corresponding npm version.
You can install a specific version of Node.js using the command nvm install [version]. For example, nvm install 14.17.3 will install Node.js version 14.17.3.
Yes, you can uninstall a specific Node.js version using the command nvm uninstall [version]. For example, nvm uninstall 10.15.0 will uninstall Node.js version 10.15.0.
You can list the installed Node.js versions using the command nvm lscode or nvm list.
Yes, you can set a default Node.js version using the command nvm alias default [version]. This version will be used whenever you open a new terminal window.
To switch between Node.js versions, you can use the command nvm use [version]. For instance, nvm use 12.22.6 will switch to Node.js version 12.22.6.
NVM is useful when you work on projects that require specific versions of Node.js. It allows you to switch between these versions seamlessly, ensuring compatibility and avoiding version conflicts.
Node Version Manager (NVM) is a command-line tool that allows you to easily manage multiple installations of Node.js and switch between different versions on the same machine.
Yes, you can. You can install a previous version of Node.js using the command nvm install [version].To switch between Node.js versions, you can use the command nvm use [version]. For instance, nvm use 12.22.6 will switch to Node.js version 12.22.6.
I write clean, readable and modular code. I love learning new technologies that bring efficiencies and increased productivity to my workflow.
Network admin, freelance web developer and editor at SitePoint.
© 2000 – 2024 SitePoint Pty. Ltd.
This site is protected by reCAPTCHA and the Google Privacy Policy and Terms of Service apply.


댓글